|

**
CERCA DE FLORES **
(EdithSpigai)
Material

PSP_X7
Plugin Eye Candy 4000
Filter Factory Gallery H
Plugin AAA Frames
Tubes
Uma Mask
Roteiro
1- Escolha um Tube, abra na Área de Trabalho, Edit >
Copy, minimize e reserve.
2- Abra uma New Image --Transparent de 1000 x 550 px e
preencha com um gradiente
Linear > A=0/R=1 - invert marcado.
#552102 - #f3be93
3- Selection > Select All
4- Edit > Past Into Selection
5- Selections > Select None
6- Effects > 3D Effects > Seamless Tiling -- Default
7- Adjust > Blur > Motion Blur -- Angle=270,00 -
Strength (%)=100 (Duas vezes)
8- Enhance More
9- Duplicate Layer
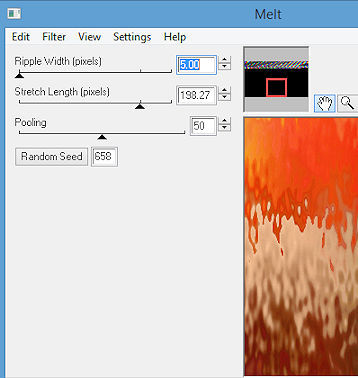
10- Plugin Eye Candy 4000 > Melt > 5.00/198.27/50/658
11-
Effects > Artistic Effects-- Posterize= Levels: 15
12- Plugin Eye Candy 4000 > Weave >
33.00/10.00/50/50/11.00
13-Adjust > Brightness And Contrast > Brightness= 0
Contrast= 10
14- Aplique a Mask Itaci Mask_BG.
Layers > Merge > Merge Group
15- Com a ferramenta Magic Wand selecione a figura em
seguida > Invert a seleção >
Nova Layer > past into selection > tube das flores do
item 1.
Diminua a visibilidade para 70% > Layers > Merge Down
16- Effects > 3D Effects > Drop Shadow nas configurações
abaixo:
4 / 4/ 80 / 20,00 Black (repetir em negativo)
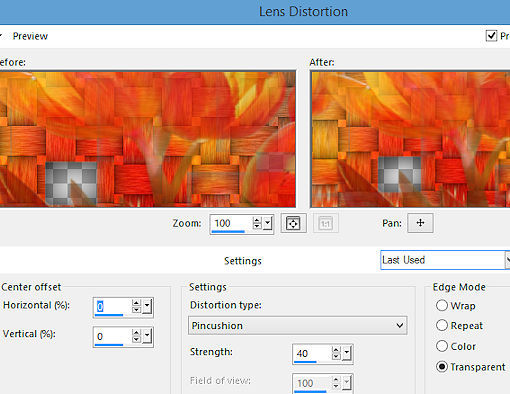
17-
Effects > Distortion Effects > Les Distortion
18-
Image . Rezise > 95%
19- Ative a Raster 1 > Duplicate Layer
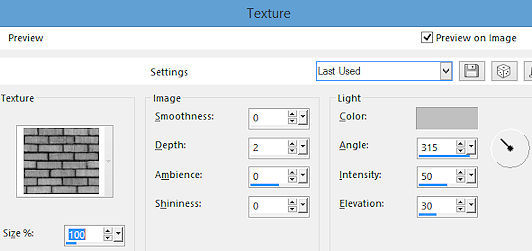
20- Na Cópia da Layer: Effects > Texture Effects >
Texture
21-
Plugin MuRa's Meister > Perspective Tiling
80/0/0/20/0/0/100/255
22- Effects > 3D Effects > Drop Shadow nas configurações
abaixo:
-4 / 0/ 80 / 10,00 (na cor do seu trabalho)
23- Adjust > Sharpen
24- Ative a Raster 1 > Filter Factory Gallery H > Alias
Blur > 28/28
25- Edge
Effects > Enhance
26- Na Layer da figura (Cerca de Flores) Centralize
Objects > Align > Horizontal Center
27- Cole seus tubes e enfeite ao seu gosto.
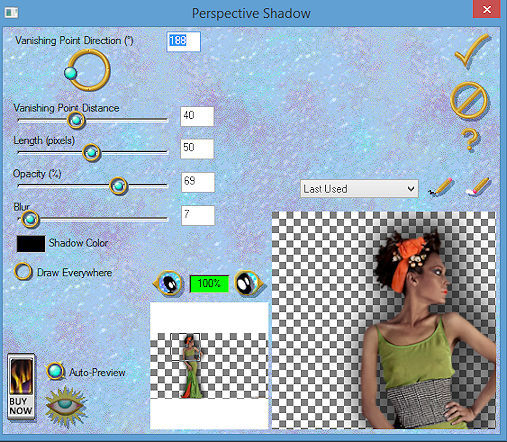
28- No Tube principal aplicar o Plugin Eye Candy 4000 >
Perspective Shadow > nesta configuração ou de sua
preferência.
29-
Escreva o texto **cerca de flores** com a Font > MBats
configurei no tamanho 36 (ou como preferir)
30- Plugin Greg's Factory Output Vol III > Pool Shadow
(Default)
31- Effects > Drop Shadow > 1/1/50/1,00 #000000
32- Layers > Merge Visible
33-
Adjust > Brightness and Contrast > Brightness/contrast
34- Plugin AAA Frames > Foto Frame
10/0/0/0/0/0/0/100
35- Assine e salve em jpg.

**
Tutorial Elaborado em SP_27/04/2016 por Edith Spigai **
Creditos:
Tube: By Anna Ridzi
MTM Brigitte
Cré@Tubes
Tutorial: EdithSpigai
 |